- Slut i Lager


Veritas® Wide-Blade Conversion Kit
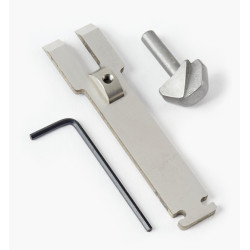
An excellent way to extend the functionality of the Veritas® small plow plane, this conversion kit allows the plane to accommodate our tongue-cutting blades as well as our straight blades over 3/8" wide. Designed to clamp and support both sides of the cutter to prevent twisting in use, the kit is composed of a 5" long machined ductile iron skate with a brass locking knob and a parallel adjustment screw (used to ensure the skate is aligned with the fence).
Easy to install or remove from the guide rods, the kit is available in right-hand and left-hand versions to match our small plow plane. Made in Canada.
(05P51.60)
(05P52.60)
The Veritas® Wide-Blade Conversion Kit consists of a machined ductile cast iron sliding skate that will enable the Veritas® Small Plow Plane to be used with blades wider than the original maximum of 3/8". It is available in both right-hand and left-hand versions to match your small plow plane.

Figure 1: Conversion kit components (right-hand version shown).

Figure 2: Preparing the small plow plane.

Figure 3: Installing the sliding skate.

Figure 4: Blade installation.
Caution: Remove the blade from the small plow plane before installing the conversion kit.

Because the clamping knob is slightly behind the blade, the force of the clamping knob may cause the sliding skate to toe out (since the distance between the sliding skate and the body is greater at the front). Bring the fence up against the sliding skate to verify that it is parallel. If it is toed out, you will see a gap between the fence and the sliding skate. Use the parallel adjustment screw to bring it back into alignment with the fence. If the screw is difficult to turn, the clamping knob is too tight and will need to be loosened a quarter turn.
Set the depth of cut and the depth stop as indicated in the small plow plane instructions.
Note: If blade adjustment is difficult, loosen either the sliding skate clamping knob or the parallel adjustment screw.

The position of the groove (i.e., the distance from the edge of the workpiece to the groove) is determined by the fence setting. Slide the fence until the distance from the face of the fence to the outside edge of the blade is equal to the required groove position. Tighten the fence knobs.
The sliding skate can be used with tongue-cutting blades to produce the tongue on the edge of a board to match a groove. Tongue-cutting blades are available separately; each comes with a depth stop and a shaving deflector.
Note: To ensure a strong joint and to prevent shavings from jamming in the plane, the tongue size should be a minimum of one third the board width (e.g., 1/4" tongue on 3/4" board).
Remove the depth stop from the plane, as it will be in the way of the tongue-cutting blade. Set the tongue height by adjusting the position of the depth stop on the tongue-cutting blade (see Figure 7). Tongue height is typically equal to tongue width. In fact, in the case of the 1/4" tongue-cutting blade (due to the dimensional constraints of the plane itself), the only possible depth setting is 1/4".
Install the tongue-cutting blade as you would any wide blade (see above), then install the shaving deflector where the depth stop was on the plane (see Figure 8).


Use the fence to position the tongue-cutting blade where desired on the edge of the board. When the tongues have been cut, swap the blade with an appropriately sized one to cut the matching groove.
The sliding skate is ductile cast iron and comes treated with rust preventative. Remove this using a rag dampened with mineral spirits. Clean all machined surfaces.
We recommend that you initially, then periodically, apply a light coat of silicone-free paste wax to seal out moisture and prevent rusting; this also has the added bonus of acting as a lubricant for smoother planing. Wipe off any wood dust from the surfaces that you will be waxing, apply a light wax coating, let dry, then buff with a clean soft cloth. At the same time, the solvents in the wax will remove any harmful oils left from your fingers that can lead to corrosion.
If storage conditions are damp or humid, the conversion kit should, in addition to the treatment outlined above, be wrapped in a cloth or stored in a plane sack. This precaution will also guard against dings and scratches.

Särskilda referenser
Du kanske också gillar